
Ever felt like DIY projects are too hard for beginners? Start with small projects like chalkpaint candlesticks or floating shelves. They let you build confidence and learn useful skills. These simple projects use only a few materials and have clear steps. You can see quick progress and soon find joy in making things yourself.
DIY Projects for Beginners: Easy Starter Ideas
Small DIY wins build your confidence and help you learn new skills with tools and techniques. Each simple project lets you try something new and gather practical tips for future projects.
Beginner projects should use few materials and clear instructions. They let you experiment, learn from mistakes, and improve your skills without spending a lot of money.
- Chalkpaint Candlesticks: Use chalk-finish paint to create vintage candlesticks. Estimated time: 1-2 hours. Cost: under $20.
- Floating Wood Shelves: Build sleek shelves with basic hand tools and simple mounting. Estimated time: 2 hours. Cost: under $20.
- Entryway Shoe Rack: Create a custom wood rack to organize your shoes. Estimated time: 1-2 hours. Cost: under $20.
- Oversized Art Piece: Turn a plain canvas into a statement piece using simple paint techniques. Estimated time: 1-2 hours. Cost: under $20.
- Built-in Laundry Tower: Make a small, space-saving storage unit for laundry needs. Estimated time: 2-3 hours. Cost: under $20.
- DIY Wooden Lanterns: Craft charming lanterns perfect for home accents or events with few materials. Estimated time: 1-2 hours. Cost: under $20.
Choose a project that fits your interests and the tools you already have. When you work on something that inspires you, you stick with it and enjoy learning along the way.
Basic Woodworking Projects for Beginners: Build Your First Piece
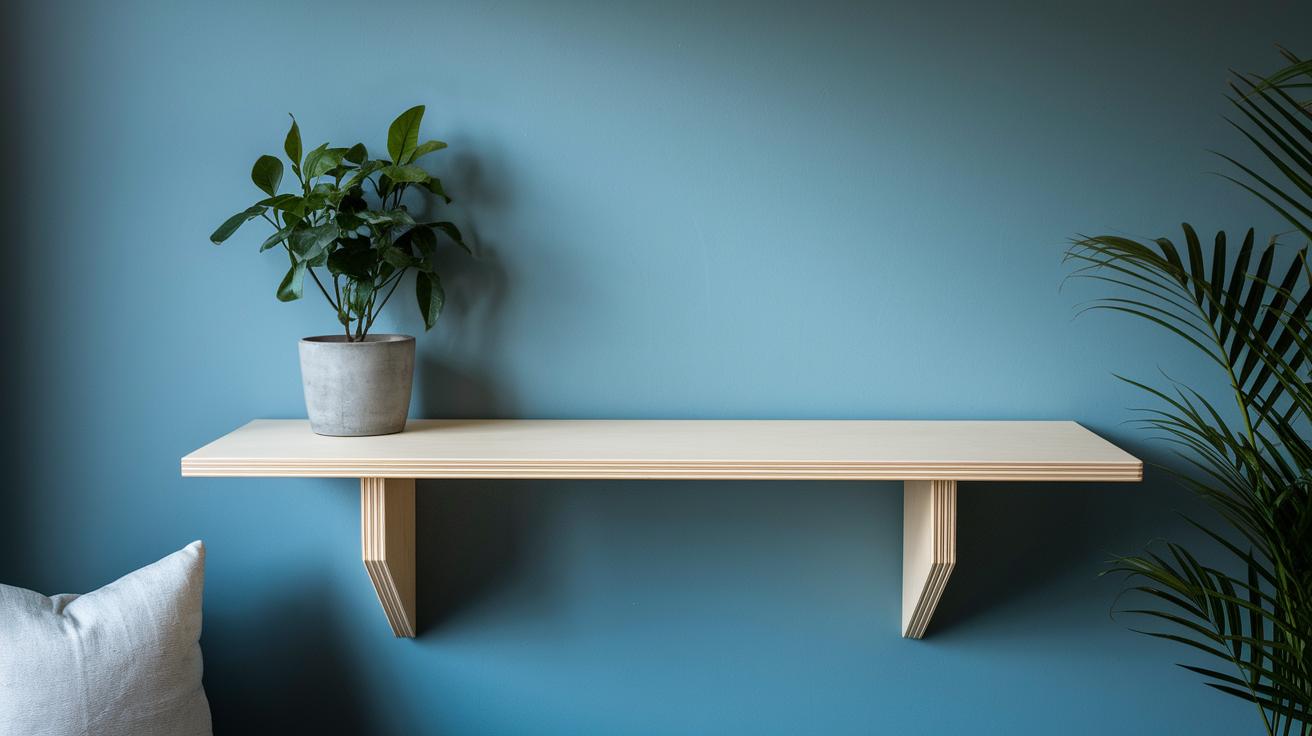
Floating shelves make a neat starter project that builds both skill and confidence. With everyday items like 2×4 lumber and plywood, you can create a practical piece that adds style to your room. Visualize a clean, modern shelf that appears to float on your wall, a simple design that stands out.
- Cut a 24 in (61 cm) piece of plywood for the shelf top. Also, cut two support pieces from a 2×4 to your desired depth.
- Sand every edge until they feel smooth. Run your hand along the wood to check.
- Mark where you will drill holes on the support pieces, keeping the marks evenly spaced.
- Bolt the support pieces together using screws. Use your drill to get a secure fit.
- Mount sturdy wall brackets where the support will hang. Make sure you place them precisely.
- Set the shelf on the supports and secure it with screws. Check that it sits evenly.
- Choose a finish, stain for a natural look or paint for a splash of color. Let it dry for 1-2 hours.
- Hang the shelf on the wall with a level to make sure it is straight. Adjust as needed for a professional look.
| Project | Estimated Time | Cost |
|---|---|---|
| Birdhouse | 2-3 hours | $15 |
| Photo Frame | 1-2 hours | Under $10 |
| Side Table | 3-4 hours | $25 |
Creative Home Decor DIY Projects for Beginners
Decor projects are a fun way to show off your style and make your space truly yours. Even a small project can change the feel of your home with just a few supplies and simple techniques.
Chalkpaint Candlesticks
- Pick a chalk-finish paint that fits your color scheme. A soft off-white or pastel shade works great for a vintage feel.
- Clean your candlestick base well. Then use a brush to apply a thin, even coat.
- Wait 15–20 min for the paint to dry. Apply a second coat to deepen the color.
- Lightly distress the surface with a dry brush to add a bit of rustic texture.
Oversized Canvas Art
- Start by lightly sketching your design on a large canvas with a pencil.
- Use painter’s tape to mark sections and keep your shapes clear.
- Paint with acrylics using smooth, deliberate strokes.
- Let the colors dry before hanging the art securely using simple hanging hardware.
Resin Coasters
- Mix resin and hardener at a 1:1 ratio in a well-ventilated area. Always wear gloves.
- Pour the mixture into silicone molds, ensuring each mold is filled evenly.
- Allow the resin to cure for 24 hr. This gives you a hard, glossy finish.
- Remove the coasters when fully cured to protect your surfaces with a unique, handcrafted look.
Epoxy Tray Design
- Pour a base layer of epoxy into a silicone mold.
- Add a few drops of your chosen pigments in thin layers. Use a spatula to gently swirl the colors together.
- Let the epoxy cure completely, then polish the surface.
- Enjoy your sleek, vibrant tray that turns everyday items into art.
Budget-Friendly Upcycling DIY Projects for Beginners
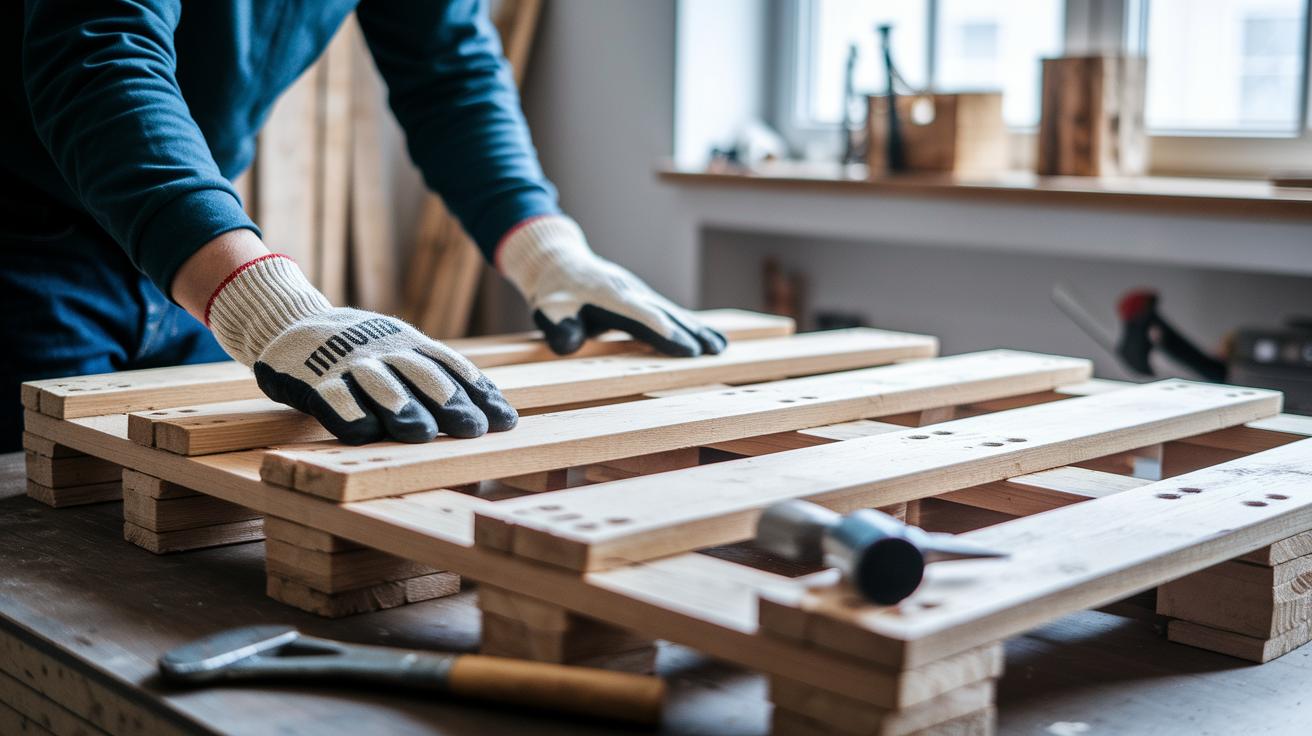
Choose pallet wood that is free from chemicals and damage. Check every pallet carefully before taking it apart with a crowbar, hammer, or saw. Wear gloves and eye protection when removing nails and sanding rough spots. This careful work makes sure your wood is safe and ready for your projects.
Pallet Wood Planter Box
Cut the pallet wood into even, easy-to-handle boards for the planter box sides. Use rust-resistant screws to join the pieces securely. Apply a non-toxic outdoor sealant to keep the planter safe from moisture and wear.
Reclaimed Wood Picture Frame
Cut your reclaimed wood at an angle (miter cuts) for a smooth, neat frame. Use strong wood glue to stick the pieces together and clamp them until the glue dries. If needed, add small nails for extra support. Lightly sand the frame and apply a stain to bring out the wood’s natural grain.
Wine Crate Shelves
Reinforce the corners of your wine crate shelves with extra screws and wood glue. This extra step makes sure the shelves are strong enough for daily use.
When mounting the shelves, use proper wall anchors and screws. Double-check that the shelf is level and firmly attached for safety and a professional look.
Simple Home Improvement DIY Tips for Beginners
Accent Wall Painting
Start by cleaning the wall with a damp cloth and a mild cleaner. Patch any small holes for a smooth surface. Next, choose a high-quality accent paint. One gallon generally covers 350–400 sq ft (32.5–37.2 m²) and costs about $25–$35. Use a roller for large areas and a brush for edges. Work in even strokes to achieve a clean, professional finish.
Peel-and-Stick Wallpaper
Begin by measuring your wall carefully. Make sure to subtract areas for windows and trim. Cut the wallpaper into strips with a straight edge and a utility knife. Align the first strip at the top of the wall and slowly lower it to keep the pattern consistent. Smooth out any air bubbles and wrinkles with a squeegee by working from the center out toward the edges.
Cabinet Hardware Upgrade
Remove the old cabinet knobs using a screwdriver. Save the screws if they can be reused. Pick new hardware that fits your décor and boosts the cabinet's function. Align the new knobs with the existing holes and tighten the screws evenly. Step back and enjoy your refreshed cabinet look.
DIY Outdoor Projects for Beginners: Easy Backyard Creations
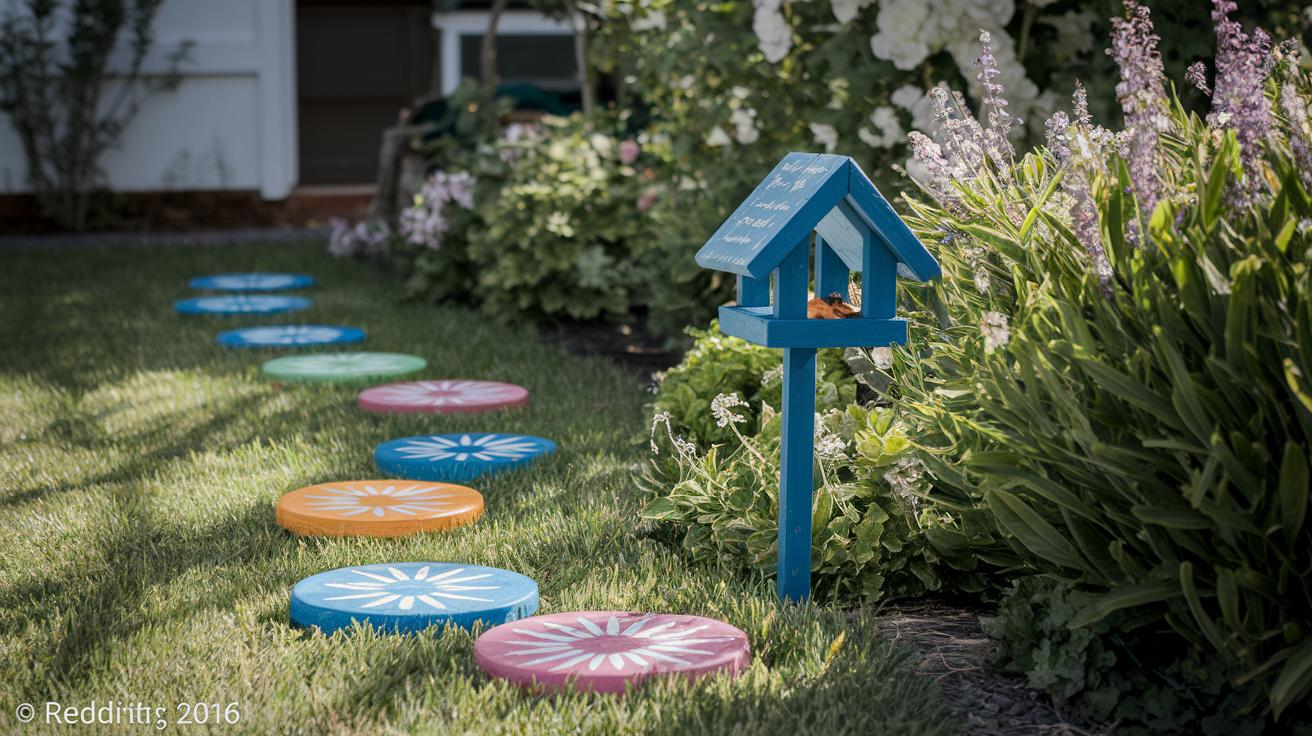
Brighten up your yard with simple projects that add style and usefulness. These ideas are easy to build, cost friendly, and fun to create.
Painted Stepping Stones
Mix concrete with water in a 3:1 ratio (3 parts concrete to 1 part water). Pour the mix into silicone molds that you prepared. When the surface looks a bit set, press in mosaic tiles, imprints, or hand-paint a design. Let the stones cure as directed before you set them in your pathway.
DIY Bird Feeder
Cut scrap wood into pieces that are about 6 in (15 cm) by 4 in (10 cm). Nail or screw the pieces together to form a small box. Drill a few small holes in the sides so water can drain out. Then, mount the feeder on a post or hang it from a sturdy branch to welcome birds to your garden.
Simple Garden Bench
Cut three 2×4 planks to your needed lengths, one for the seat and two for the legs. Sand each board until they feel smooth. Use screws and wood glue to join them securely. Seal the bench with outdoor-rated varnish to protect it from the weather.
For extra strength, attach brackets to the corners. This simple step boosts the bench’s stability and gives it a neat, finished look that stands up well against the elements.
Beginner-Friendly Electronics and Gadget DIY Projects
If you're ready to jump into electronics, these projects are a great way to learn by doing. You can work with simple parts like breadboards, LEDs, and resistors (220Ω). With these, you'll see how circuits work without having to solder anything. They help build your basic circuit skills and boost your confidence to tackle more advanced projects later.
Blinking LED Circuit
In this project, you use a breadboard, an LED, a resistor, and a 9V battery to create a light that blinks on and off. Start by arranging the components on the breadboard following a wiring diagram. If your design needs programming, include a small code snippet to control the blink.
Simple Siren Circuit
For a siren circuit, you'll need a 555 timer chip, some resistors, and a speaker. Begin by connecting the 555 timer with the required capacitors and resistors to set the timing intervals. Then attach the speaker so that it makes a pulsing siren sound when the current flows.
Beginner Robot Kit Assembly
With a beginner robot kit, you can build a mini robot using a pre-designed chassis, motors, and connectors. First, assemble the chassis. Next, connect the motors to the battery pack, checking that every connection is secure to ensure the best power setup.
These projects are fun and practical. They usually cost around $15–25 and take about 1–2 hours to complete. With each project, you'll gain hands-on experience that gets you ready for more challenging electronic and mechanical builds.
Kid-Friendly Craft Kits and Family DIY for Beginners
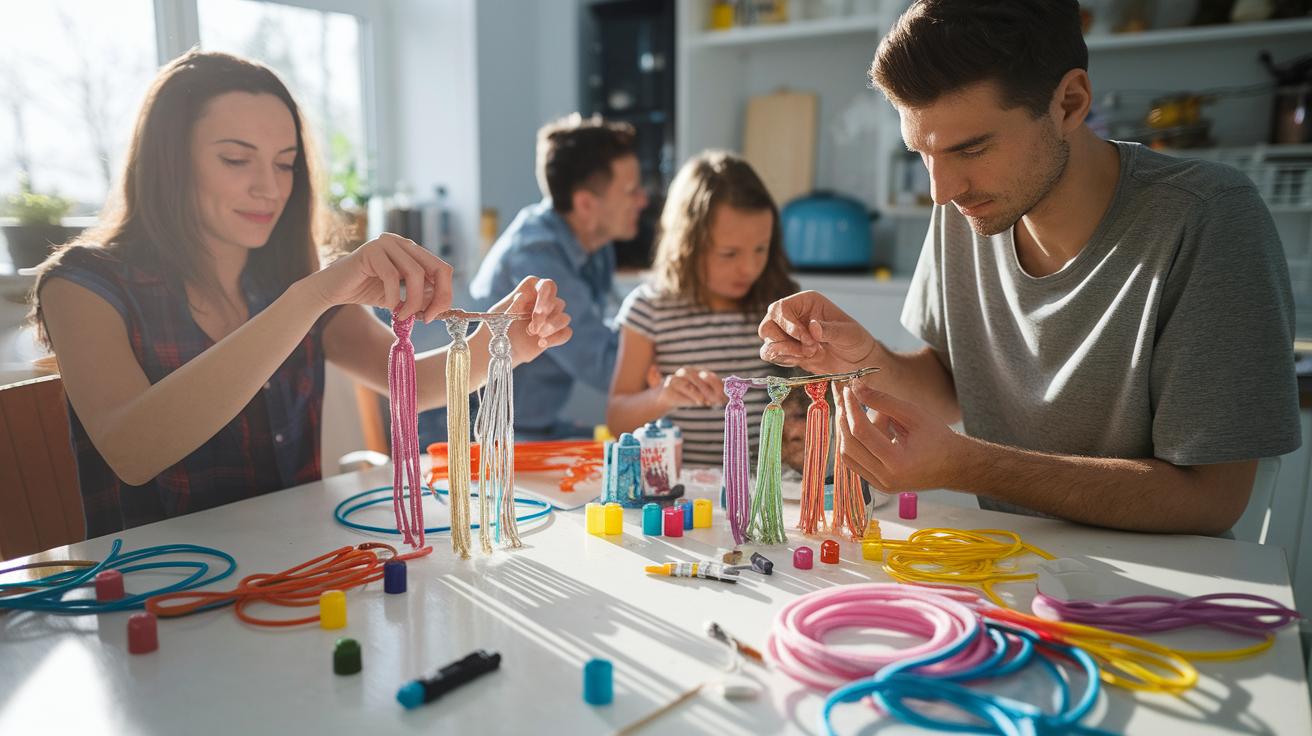
Family projects are fun and help everyone learn new skills. These entry-level kits come with all the materials you need. Projects take about 30–60 minutes and cost between $10 and $20. Both kids and adults can enjoy making something unique while building fine motor skills.
Macrame Keychain Kit
This kit includes colorful cords and an easy instruction sheet that shows you basic knots step by step. Follow the clear directions to make a charming keychain that adds a personal touch to everyday items. It’s a simple and enjoyable project for the whole family.
Model Painting Set
This set comes with small models and bright acrylic paints. First, assemble the miniature figures. Then, use the paints to add unique details that make your model stand out. You also get a few display tips to help you showcase your finished piece at home.
No-Sew Sewing Project
This kit is perfect for beginners. Instead of sewing, you use fabric glue to attach embellishments to pre-cut fabric pieces. Safety guidelines are included to ensure you apply the decorations securely. The result is a creative and safe project that is easy to make.
Monetizable DIY Projects for Beginners: Turn Crafts into Cash
Custom Candle Projects
Start by melting wax in a double boiler. Add fragrance oils and a little dye to give the wax a special color. Slowly pour the warm wax into your jars or molds. Let the wax set gradually while you mix in gentle scent combinations. When the wax hardens, trim the wick and package your candles neatly. You can expect to spend about $5 on materials, and each candle can sell for roughly $15–20.
Resin Jewelry Creation
Mix the resin and hardener in a 1:1 ratio. Follow your kit's instructions closely to get a smooth blend. Pour the mixture into silicone molds. Add pigments in thin layers, and work carefully to remove air bubbles. Allow the resin to cure completely before polishing each piece to a shiny finish. Usually, the material cost is around $10, and you can sell the jewelry for about $25.
Art Fair Marketing Tips
When you display your crafts at art fairs, start by researching similar products for pricing ideas. Choose packaging that is clear and attractive to show off your unique style. Use social media, like Instagram, to post clear and appealing photos of your work. Offer bundled deals to encourage bigger purchases and add detailed labels on your items. This helps build trust with your customers.
Home Workshop Setup for DIY Beginners: Essential Plans
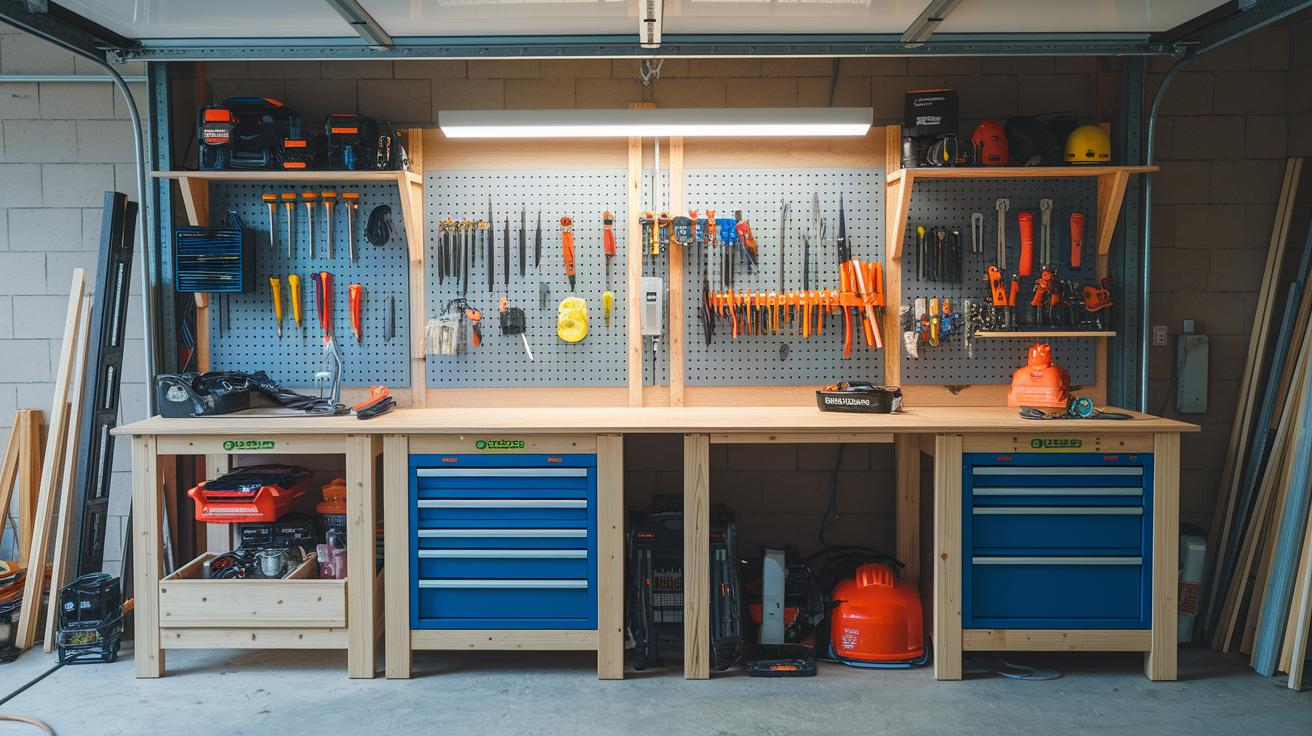
Before you start, plan your workspace layout. Divide your area into clear zones for building, tool storage, and safety. Make sure you have a sturdy workbench, a spot for your basic tools (hammer, screwdriver set, cordless drill, tape measure), and a dedicated space for safety gear (goggles, gloves, ear protection). The total setup is estimated to cost about $150–200. This simple plan keeps your workspace neat and efficient.
DIY Workbench Blueprint
- Build a strong frame using 2×4 lumber. Measure and cut the wood to form a solid rectangular base.
- Attach a smooth plywood top with the proper screws and wood glue. This top will be your main work surface.
- Check that the workbench is level with a spirit level. Sand any rough spots and then apply a protective finish such as durable paint or natural wood stain.
Tool Organizer Installation
Mount a wall pegboard near your workbench. Hang hooks and place small storage bins for screwdrivers, pliers, and drill bits. Label each section so you can quickly find the tool you need when starting a project.
Safety Station Setup
Set aside an area just for safety gear. Place a first-aid kit and a small fire extinguisher in this zone. Store goggles, gloves, and ear protection in an easy-to-reach spot. This space keeps safety top of mind during your DIY projects.
Final Words
In the action, you reviewed step-by-step plans that guide you through woodworking, home decor, upcycling, and even simple electronics. The outline showed how to tackle projects with clear tools lists, budget-friendly costs, and precise measurements. Small wins help build your DIY confidence while teaching you practical skills. These diy projects for beginners offer safe and affordable methods to transform your space. Keep measuring twice, follow the instructions, and enjoy every progress step as you build your skills and create a home you love.
FAQ
How do DIY projects for beginners guide you step by step?
The DIY projects for beginners offer step-by-step instructions with clear guidance and safe techniques, building your skills gradually while making the process accessible and enjoyable.
Can beginners access free DIY projects?
The available free DIY projects provide step-by-step plans with no cost, making them ideal for newcomers who want to explore creative projects while keeping expenses low.
What kind of DIY projects are simple enough for students?
The simple DIY projects for students focus on low-cost, quick tasks that boost practical skills and creativity while keeping stress levels low and emphasizing safety.
How do home DIY projects for beginners work?
The home DIY projects for beginners use clear, simple steps with minimal tools and affordable materials, allowing you to enhance your space and build crafting confidence along the way.
What are simple DIY projects for kids?
The simple DIY projects for kids offer safe materials and easy tasks that promote creativity and fine motor skills, turning craft time into a fun and educational family activity.
What makes DIY home projects for adults engaging?
The DIY home projects for adults emphasize practical designs and accessible techniques that add personal style and functionality, fitting well into busy schedules with budget-friendly methods.
What are the best DIY projects for beginners?
The best DIY projects for beginners include low-skill, high-reward tasks using clear instructions, affordable materials, and simple tools, ensuring quick wins and steady progress in your DIY journey.
How can easy DIY projects be turned into a business?
The easy DIY projects to sell focus on marketable crafts that are affordable to produce and appealing to customers, offering an opportunity to generate extra income with consistent quality.
How can you test your DIY skills with new projects?
The advice to test your DIY skills encourages taking on projects slightly beyond your comfort zone, helping you grow, have fun, and gain practical experience while building confidence.
What does Wildest Dreams DIY inspire?
The Wildest Dreams DIY projects inspire creative exploration where innovative ideas meet beginner-friendly techniques, showing that even the boldest projects can start with simple, accessible steps.
How do Pretty Good Tools Recipes help in DIY projects?
The Pretty Good Tools Recipes offer practical methods for setting up and using tools effectively, providing step-by-step guidelines that help improve results and make complex tasks easier.
