
Have you ever wondered if you can give your bathroom a fresh new look without spending a fortune on a professional? Many people think that a stylish bathroom means high costs. This guide shows you how to plan a DIY bathroom refresh that saves you money while still looking great. We explain how to choose the best materials and plan carefully to trim expenses without cutting quality. Follow along to learn how a simple budget plan can turn your bathroom into a beautiful, cost-effective space.
DIY Bathroom Refresh Budget Overview
It is important to set a clear budget when planning a bathroom update on a tight budget. For a half-bathroom, you might spend between $2,500 (about 2,300 euros) and $15,000 (about 13,800 euros). Your design choices, materials, and labor will change the cost. When you do the work yourself, planning ahead and comparing prices is key to stretching your dollars.
For example, one project cost about $5,760.81 in total, and the homeowner paid $4,613.97 out-of-pocket. Doing the work yourself can cut labor costs. In this project, one contractor handled two bathrooms. By managing tasks like demolition, plumbing changes, and finishing work on your own, you can get more value without losing quality.
Whether you want a quick, budget-friendly update or a more detailed design, these numbers give you a solid starting point. Breaking the expenses into smaller steps helps you keep spending in check while reaching your desired look. For a structured plan, check out the DIY project budget template to set your budget and track your costs through your renovation.
Materials Cost Analysis for a DIY Bathroom Refresh
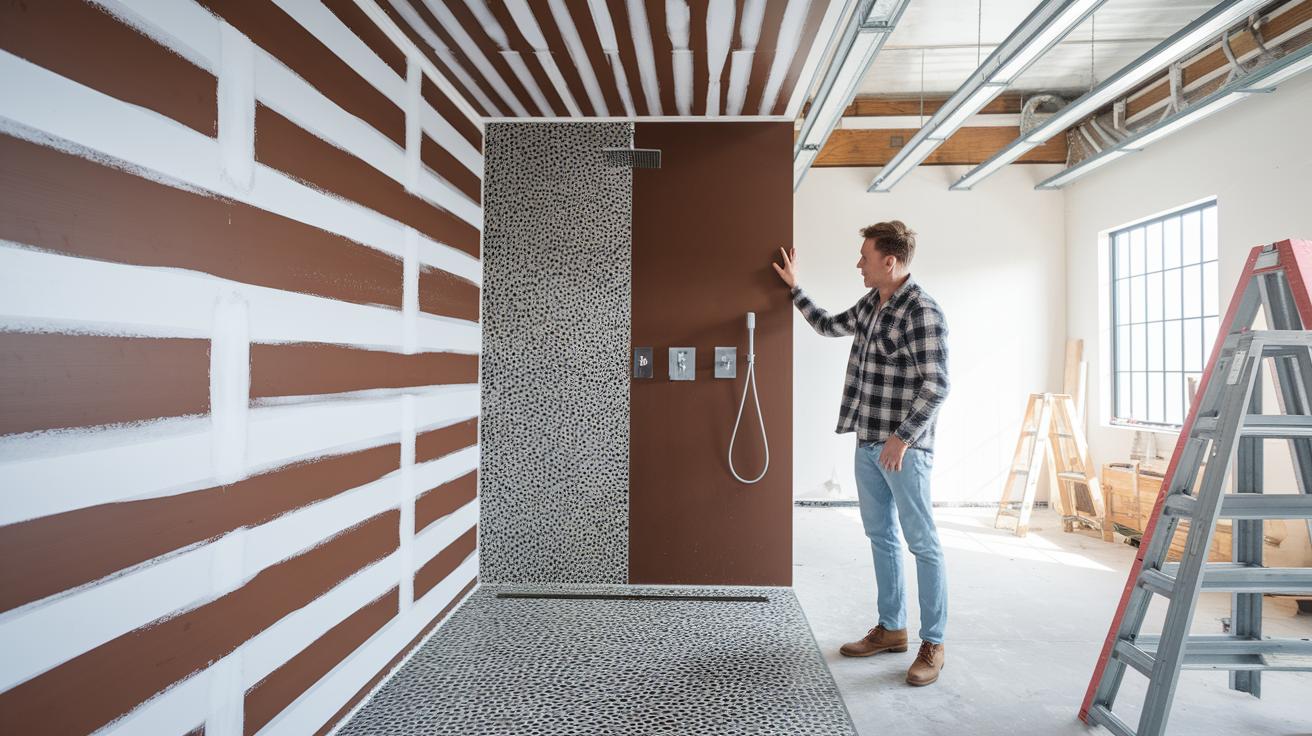
We paid $21.96 for each drywall sheet, which keeps the cost simple and clear. For the walls, we used Hardibacker panels that we taped, mudded, and textured. After that, we applied a waterproof coating to keep the area safe in wet spots like the shower.
A natural stone pebble mosaic tile gave the shower pan a unique look. We set the tiles with Cobblestone-colored Mapei grout, which created a smooth and distinct finish without needing extra sealant. Each material was chosen for its quality and practicality, keeping the project stylish yet budget-friendly.
Finally, we painted the walls using Behr’s "Death by Chocolate" for a bold touch that ties the room together. To enhance the design, we added flexible PVC trim and installed 18 in (46 cm) x 65 in (165 cm) WallBlush wallpaper mural panels. These choices highlight the bathroom's best features and prove that you can use quality materials on a DIY project without overspending.
Tool and Equipment Budget for an Independent Powder Room Makeover
We kept our costs almost zero by using tools we already had and borrowing a few from friends. Instead of buying or renting tools, we turned to our own toolkit for demolition, drilling, and finishing. For example, when we needed a power drill, we borrowed one from a neighbor. This simple switch saved money and kept our workshop free of extra clutter.
Sticking with familiar tools helped us avoid extra expenses and stick to a lean budget. Knowing what you already have also builds confidence and stops you from overspending. Plus, when you borrow equipment, you use items that have already proven their reliability. This smart approach allowed us to spend more on quality materials and careful finishing without breaking the bank.
Labor Savings Strategies in a Self-Made Restroom Renewal

We saved money by doing the demolition and remodeling ourselves. The Materials Cost Analysis shows that removing the coat closet and wall opened up the room nicely. We shifted the plumbing by moving the toilet a few feet and adding new water lines for the shower and sink, which also helped lower costs.
We rebuilt the walls using Hardibacker panels, applied a waterproof coating, and set natural stone mosaic tiles in the shower. First, we taped and mudded the panels, then we added the waterproof layer before tiling. This careful, step-by-step work turned what could have been costly professional labor into real savings.
Our DIY approach cut down on expenses while keeping the quality high. The Materials Cost Analysis details how each task, from demolition to trim work, played a part in saving on labor costs.
Step-by-Step Budgeting Framework for Homemade Washroom Updates
A clear budgeting plan is essential for any DIY washroom update. This framework splits the project into six stages, each with a set percentage of your total budget. By planning each phase, you can manage costs confidently over a six-week period. For tips on measuring material needs, check out this guide on how to estimate materials for a DIY project (link provided).
- Demolition (10%): Remove old fixtures and walls to start with a clean canvas.
- Plumbing (15%): Adjust your plumbing lines, add water connections, and secure proper flow for both the shower and sink.
- Wall Construction (20%): Install Hardibacker panels, then tape and mud the seams before applying waterproofing for lasting strength.
- Tiling (25%): Lay natural stone mosaic tiles in the shower pan and use Cobblestone-colored grout for a refined finish.
- Painting and Trim (15%): Apply a bold coat of paint and add PVC trim or wallpaper panels to create a stylish look.
- Decorating (15%): Choose practical yet attractive accents to complete your budget-friendly washroom refresh.
Tracking your expenses is simple over a six-week period when you know your steps. This plan makes your project both affordable and achievable, from demolition to the final decorative touches. Review each stage as you go and adjust your plans if needed. With this approach, every dollar is justified, keeping surprises low and quality high. Your careful planning turns your vision into a practical, affordable reality.
Cost-Saving Tips for a Crafted Water Closet Refresh
Upgrade your water closet with modern flush systems and sensor-activated fixtures. For example, some models use up to 30% less water, which cuts recurring expenses while reducing water waste.
Look for unique parts from new sources. One project used reclaimed porcelain from industrial sites to build a stylish, long-lasting fixture without the high cost of new materials.
Check out case studies for ideas. In one example, a contractor replaced standard flush components with advanced water-saving models and reaped long-term savings. This shows that spending a bit more upfront can pay off later.
Keep your water closet in top shape with regular maintenance. Clean it often with pH-neutral cleaners and adjust the flush timing as needed. This simple care routine helps maintain efficiency and extends the life of your fixtures.
DIY Bathroom Refresh Timeline and Expense Breakdown
This bathroom update took 6 weeks from start to finish. We broke the project into clear steps to keep time and money in check. First, we removed old fixtures and walls. Then, we updated the plumbing and rebuilt the walls. We set aside specific days for each task to make sure every detail was done right.
The total cost was $5,760.81, and we spent $4,613.97 out of pocket. This careful plan helped us manage our budget and schedule without surprises.
| Phase | Duration | Cost |
|---|---|---|
| Demolition | 5 days | $576.08 |
| Plumbing | 7 days | $1,152.16 |
| Wall Build | 10 days | $1,728.24 |
| Tiling | 7 days | $1,440.20 |
| Finishing | 7 days | $864.12 |
Final Words
In the action of upgrading your space, this guide broke down a clear pathway from cost estimates to hands-on labor tips. Each section highlighted budget ranges, material details, and time frames to help you plan confidently.
The post also showed how to achieve a solid bathroom refresh budget breakdown (DIY) while trimming expenses with borrowed tools and smart choices. For extra help, check the DIY project budget template and keep your project moving forward with energy and ease.
FAQ
How does a small bathroom refresh budget breakdown DIY project work?
A small bathroom refresh budget breakdown DIY project outlines expenses for materials, tools, and labor in clear stages. It offers a cost-friendly plan to update essential elements without overspending.
What is a master bathroom refresh budget breakdown DIY?
A master bathroom refresh budget breakdown DIY project details costs for upgrades like fixtures, tiling, and paint. It provides a structured expense plan that helps balance quality improvements with budget limits.
How do DIY bathroom remodel projects on a budget help manage costs?
DIY bathroom remodel projects on a budget use careful planning, cost comparisons, and smart material choices. They focus on splitting tasks into stages, saving money by reusing tools and doing the work yourself.
What are some DIY bathroom ideas for small spaces?
DIY bathroom ideas for small spaces encourage efficient layouts, multipurpose fixtures, and creative storage solutions. They focus on maximizing space without heavy spending, making the room both functional and stylish.
How can I complete a bathroom renovation under $3,000?
Completing a bathroom renovation under $3,000 involves prioritizing essential upgrades, comparing prices on materials, and utilizing DIY labor. This structured approach helps keep expenses low while still achieving significant improvements.
