
Feeling stressed by permits and inspections for your home improvement project? You’re not alone. Getting these steps sorted can save you time, money, and hassle. Our guide shows you how to list your planned changes, talk with local officials, and know when to call in a licensed pro. Follow our clear, step-by-step advice to set up your permit process and keep your project moving safely and on schedule.
Crafting Your Permit and Inspection Plan for Home Improvement
Start by listing all the changes you plan to make. Write down every update, whether it's a wall removal, electrical upgrade, or plumbing change. For example, you might note, "I measured each area and found that adding a bathroom needs a building permit and a plumbing permit." This list forms the base of your permit plan.
Contact your local building department early. Ask for details about the necessary documents, local codes, and fee schedules. Verify submission deadlines to avoid delays and fines. This step helps you meet safety standards and legal requirements.
Hire a licensed professional who understands permit management. A skilled contractor can prepare accurate plans and clear work details. For example, someone might say, "I hired a professional who filed all the required documents promptly, which prevented mistakes." Their expertise reduces permit rejections and keeps your timeline on track.
Create a schedule with key milestones. Write down dates for permit submissions, inspections (both rough-in and final), and major construction phases. This timeline acts as your project blueprint.
Set up a central folder for all your permit documents, inspection reports, and change orders. Keep in regular contact with your contractor and local officials to check on permit status. A well-organized plan for every permit and inspection helps your home improvement project run smoothly.
Identifying Necessary Permits and Inspection Requirements

Different projects need different permits. For example, you need a building permit for structural changes like adding a room or removing a wall. If you plan to rewire or add new outlets, you must secure an electrical permit. Changing your kitchen fixtures might also require a plumbing permit, while modifications to your heating and cooling system or fire safety upgrades need their own permits. Projects like demolition, expansions, solar panel installations, or building a pool have unique permit rules.
Check with your local building department to see which permits you need. Look up county guidelines to match your project details with the right permits. A checklist can help you compare your project plans with these code requirements. For instance, if you’re updating your kitchen, you may need both electrical and plumbing permits. Clear project drawings and detailed job plans make it easier to decide which permits to apply for and what inspections to schedule.
List all the permits your project requires. Then, plan for key inspection points such as a rough-in check before putting up drywall and a final safety inspection when the work is done. Submitting your permit applications at the right times can keep your project on track and help avoid delays.
Understanding Local Building Codes and Permit Applications
Start by checking the building codes for your area. Look up county rules for places like Fairfax, Arlington, Alexandria, or Prince William in Northern Virginia. Also, review local zoning rules, HOA guidelines, and neighborhood standards. This helps ensure your project follows all rules and avoids resubmissions. For example, if your home addition affects setback rules, you might need a variance request. I once had to submit detailed plans and a variance request because my project crossed a setback line.
Next, prepare your project documents. Write down exact measurements, create a list of materials, and note where changes will occur. Include current (as-built) drawings along with your planned modifications. Follow contractor guidelines closely because licensed professionals can help you apply the correct codes and avoid common mistakes.
Before you submit your application, talk with the local zoning office. Ask them to check that your project plans meet local requirements. For example, confirm that any needed easements or setback changes are clearly marked in your documents.
Finally, keep all your project documents organized. Store copies of your plans, variance requests, and approval letters in both digital and paper form. This organized record will support your permit application and guide inspectors during site visits and final reviews.
Creating a Project Timeline Aligned to Inspection Milestones

Begin by matching each construction step with your inspection dates. Write down when you'll apply for permits and schedule each review. Use a timeline to line up permit submissions and work tasks. For example, if a bathroom remodel needs a permit that takes 4–5 days to approve, set the inspection for the day after you expect approval so work stays on track.
Plan the project in clear, numbered steps:
- Write down the permit application date.
- Schedule the rough-in inspection before installing drywall.
- Set dates for electrical and plumbing reviews.
- Plan the final inspection after all work is done.
A good timeline helps avoid delays. Kitchen remodel permits might take 1–2 weeks, and whole-house additions can need several weeks. Write down how long each step should take and work with your inspector’s schedule. For example, plan a rough-in inspection once all wiring is in place but before closing the walls.
Create a visual schedule using a table, for example:
| Task | Date |
|---|---|
| Permit Submission | May 2 |
| Rough-In Inspection | May 8 |
| Final Inspection | May 22 |
For more detail, try a home renovation timeline template and adjust the schedule as you go to keep your project on track.
Building a Pre-Inspection Checklist for Smooth Compliance
A pre-inspection checklist keeps your project moving and helps you avoid permit delays. Start by gathering your permit copies, stamped plans, and change orders. Keep these papers organized in one folder so you can show them to inspectors without delay.
Clear the job site of debris and obstacles. Make sure every inspection zone is easy to reach. Mark all areas with clear permit placards so inspectors can quickly see everything meets the plan.
Schedule your inspector ahead of time. Confirm their visit for both the rough-in and final checks. Pick someone on site to answer questions and guide the inspector during the review. This checklist covers site clearance, document readiness, and clear access to every inspection area. Following these steps helps ensure that every detail is checked the first time, keeping your project on track and in line with local rules.
Use this checklist to prevent hold-ups and make sure your project meets all local requirements with ease.
Coordinating with Contractors and Inspectors for Home Improvement Projects

Choose a contractor who is licensed, insured, and bonded. This type of contractor secures required permits and handles inspections, meeting local codes and reducing risks of unapproved work. One homeowner noted, "My contractor got the permit early, so we never had delays with inspectors."
Talk openly with both your contractor and your inspector. Before you begin work, schedule a site walk-through to make sure you have all permit copies and change orders on hand. Set firm dates for rough-in checks and final inspections. A scheduling checklist can help track these key appointments. If there are delays or extra documents are needed, discuss the next steps immediately.
If your permit application stalls, permit expediters can speed up the process. Stay in regular contact to avoid surprises during inspections. Follow these steps:
- Confirm that your contractor will handle the permit process.
- Schedule a pre-inspection walk-through so all work areas are accessible.
- Keep communication open to manage waiting times effectively.
Working closely with your contractor and local inspectors creates a smooth process, minimizes delays, and ensures that your project stays in compliance.
Managing Fees, Delays, and Renewal Requests for Permits
Permit fees can be very different. For simple fixes, you might pay between $65 (about 66 EUR) and $200 (around 205 EUR). For big renovations or additions, fees can go over $2,000 (about 2,050 EUR). Set a clear budget that covers these fees so there are no surprises. Break down your project costs to know which parts may need higher permit fees.
Delays can happen if your application is not complete or if local building codes change. Always review your paperwork with a checklist to be sure every detail is there. For example, missing updated plans can send your application back, which slows down your schedule.
When your permit is about to expire, ask for an extension or renewal early. Gather any extra documents like updated plans or change orders and attach them to your renewal form. Follow these steps:
- Check your permit’s expiration dates.
- Collect any extra documents needed.
- Submit your renewal request before the permit expires.
Doing this helps reduce waiting times and keeps your project moving forward.
Documenting and Tracking Permits through Project Completion
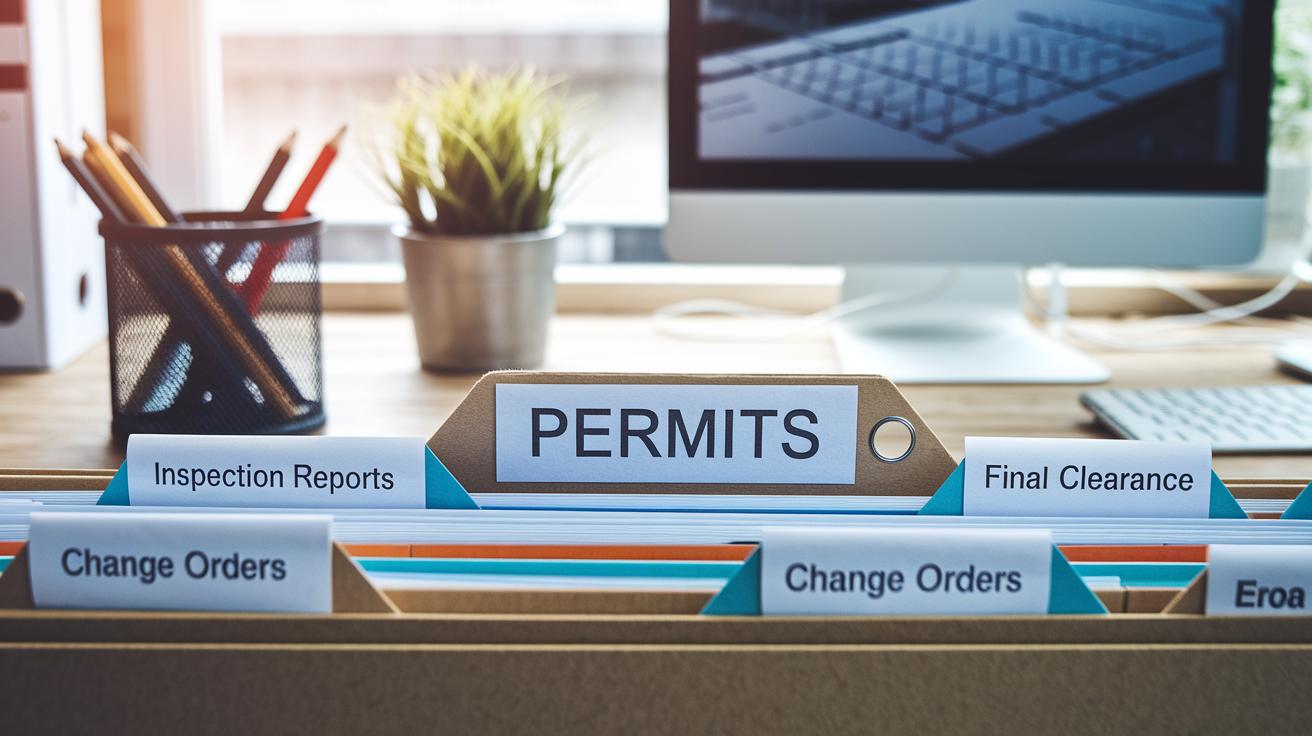
Keep all permit papers in one special project folder. In that folder, store copies of permits, inspection reports, change orders, and the final clearance certificate. A digital folder makes it easy to find documents for inspections or a future sale. Also, set up a simple version control system for plan revisions so you always work with the latest copy. This stops mix-ups with rough-in and final inspection reports.
Make a simple checklist for each milestone. For example:
- Save permit copies as soon as you pay.
- Upload each inspection report when it comes in.
- Update change orders and approved revisions.
- File away the final certificate once it is signed.
Accurate recordkeeping helps you get your certificate of occupancy and shows you met all the rules. Use clear file names and back up your files often. This way, you can track progress, show documents during inspections, and keep your records neat as the project moves forward.
Final Words
In the action, planning your permit and inspection approach sets you up for success. We covered evaluating project scope, researching local codes, and scheduling inspections and contractor meetings, all linked to how to plan around inspections and permits for home improvement. Breaking tasks into clear steps helps you stay on target and avoid delays.
Keep documents organized and track each milestone. Every step builds your confidence in tackling home projects safely and effectively. Enjoy the process and celebrate the progress as your vision comes together.
FAQ
What’s the biggest you can build without a permit?
The biggest structure you can build without a permit varies by local code. Most areas set limits on size or height before permits are required, so check with your local building department for accurate guidelines.
Do I need a permit to replace siding?
The need for a permit when replacing siding depends on local rules. Typically, minor siding repairs may not require a permit, but changes in materials or methods might, so verify with your local building department.
